Saturday, December 14, 2013

Wherein our heroine becomes obsessed with early 20th century Vienna

I love days when I discover new things!  I was spending a leisurely Saturday morning perusing Pintrest over coffee when I came across a pin by the Dreamstress and was instantly enchanted.  (photos from the collection of  the Austrian Museum of Applied Arts/Contemporary Art)


The next pin was even more enticing:


It was like wearable Klimt or a German Poiret...it was Eduard Josef Wimmer-Wisgrill -who I had never heard of but was immediately fascinated by.  I'd never seriously explored early 20th century Vienna..  but clearly its time to remedy that!

The lovely synergy with this is that Andover Fabrics just released a Downton Abbey Collection and their Mary's Berry print looks surprisingly similar to the fabric in that first gown. And I'd been wanting to play with making fabric roses like that, but just didn't have anything to use them for. There may be another project in my future!


Saturday, December 7, 2013

A real cutting table!

I've been wanting a costume stop style table you could stick pins into for ages. This morning I woke up and decided that today was the day I was going to break down and cross the project off my to-do list.

We have a game room in our basement with an 8'+ table from Ikea that we inherited from friends.  We don't use the game room much so my plan was to get a piece of homasote, cover it with muslin and set the table legs up on cinder blocks to get some additional height.  That way, if we needed the table again, I could just remove the homasote and cinderblocks.

When I did this in the 90s, I was living in Iowa and it was a simple matter of walking into Menards and buying a 4x8 sheet of homasote.  Alas, this is Atlanta and we don't have Menards.  No one in Home Depot had the slightest clue what I was talking about when I said I needed homasote and were so adamant about it not existing, I was beginning to question my own sanity.  I ended up with a 4x8 sheet of 2" foam insulation, which the guy also swore we would never get home tied to the top of our car before it broke (because, of course, our station wagon apparently has a 47" opening not a 48".)

We did, indeed, get the foam (which was, oddly enough,  a lovely shade of lavender) home with a minimum of damage (most of it incurred by the Lowe's guy that tied it to the roof in the first place). And Hobby Lobby had 90" muslin (which I didn't expect) so in under 2 hours, I had a cutting table that wouldn't kill my back, wouldn't scratch my dining room table AND I could stick pins into.  Why didn't I do this years ago?


I have some reservations that the foam is going to end up disintegrating, from cat claws and tracing pattern marking, but I will deal with that when it happens.  For now I am just happy to have a real cutting table.

Materials:
4 yards 90" muslin: $34 (I could have cut that cost in half by buying it on the web)
1 4x8 sheet of 2" foam insulation $36
4 cinder blocks $1.25 each
Staple gun & staples  $12

total cost: $88

Epilogue:  I googled Homasote to prove to myself I wasn't hallucinating and sure enough, it does exist. Better still, I found a thread on a model railroading board where someone asked where to get it because their Lowes didn't carry it.  The overwhelming response was:  Go to Menards.  Vindication! :)

Saturday, November 23, 2013

The Regency shirt (or wherein our heroine finally overcomes her fear of buttonholes)

I have a deep, dark secret...  I have little to no experience making buttonholes.  *blush*  I am far more versed in eyelets, grommets, snaps and hooks. Nothing I made during my SCA years used them, buttonholes aren't very common when you're sewing for ballet and we sent out buttonholes out to be professionally done in the other costume shops I worked in.

But Jay was kvetching that I never made him anything and I needed to replace the shirt he wore to Sunday in the Park anyway, so I set about making a simple cotton shirt.  Since I no longer had my trusty men's basic shirt pattern (what was I thinking when I donated all the patterns I'd ever drafted to the local SCA as I packed to move to Atlanta???) I settled upon Butterick Making History 4486 as a starting point ..a loose starting point.

Butterick Making History 4486

The directions..didn't make much sense to me.  I ruined one shirt body trying to put on the facings their way and read the directions for attaching the cuffs to the sleeve at least a dozen times feeling stupid before I tossed the directions into a corner and followed my instincts.  I narrowed the collar, skipped the lacing, changed the facing, added a separate cravat and ended up with a product that I was pleased enough with (it's a white cotton wardrobe staple...  it's about a 4 on the impressive project scale)..  and then it was time to put in the buttonholes...

So I cut out the pattern pieces for an Eton Jacket I was going to play with...  

I cleaned the sewing room top to bottom...  

I pressed the cotton I was using as a mockup for the jacket...

and then work got crazy, so the shirt sat for a number of weeks..

Well, work has hit a new level of crazy but we were trapped in our subdivision most of the day because of a Thanksgiving parade, so I got some sewing in ..and I had no excuse for putting off the button holes any longer.  I seriously thought about putting the buttonholes in by hand for a while I was so phobic about machine buttonholes...and I realized that my Bernina had an semi-auto buttonhole feature that let me get a decent enough buttonhole on my sixth or seventh practice attempt.   So I held my breath and reached for the otherwise finished shirt.

Are they perfect?  No.  Am I still going to try buttonholes by hand at some point?  Probably.  But they were a lot less daunting than I had been afraid they were going to be. 

Buttonholes with cufflinks

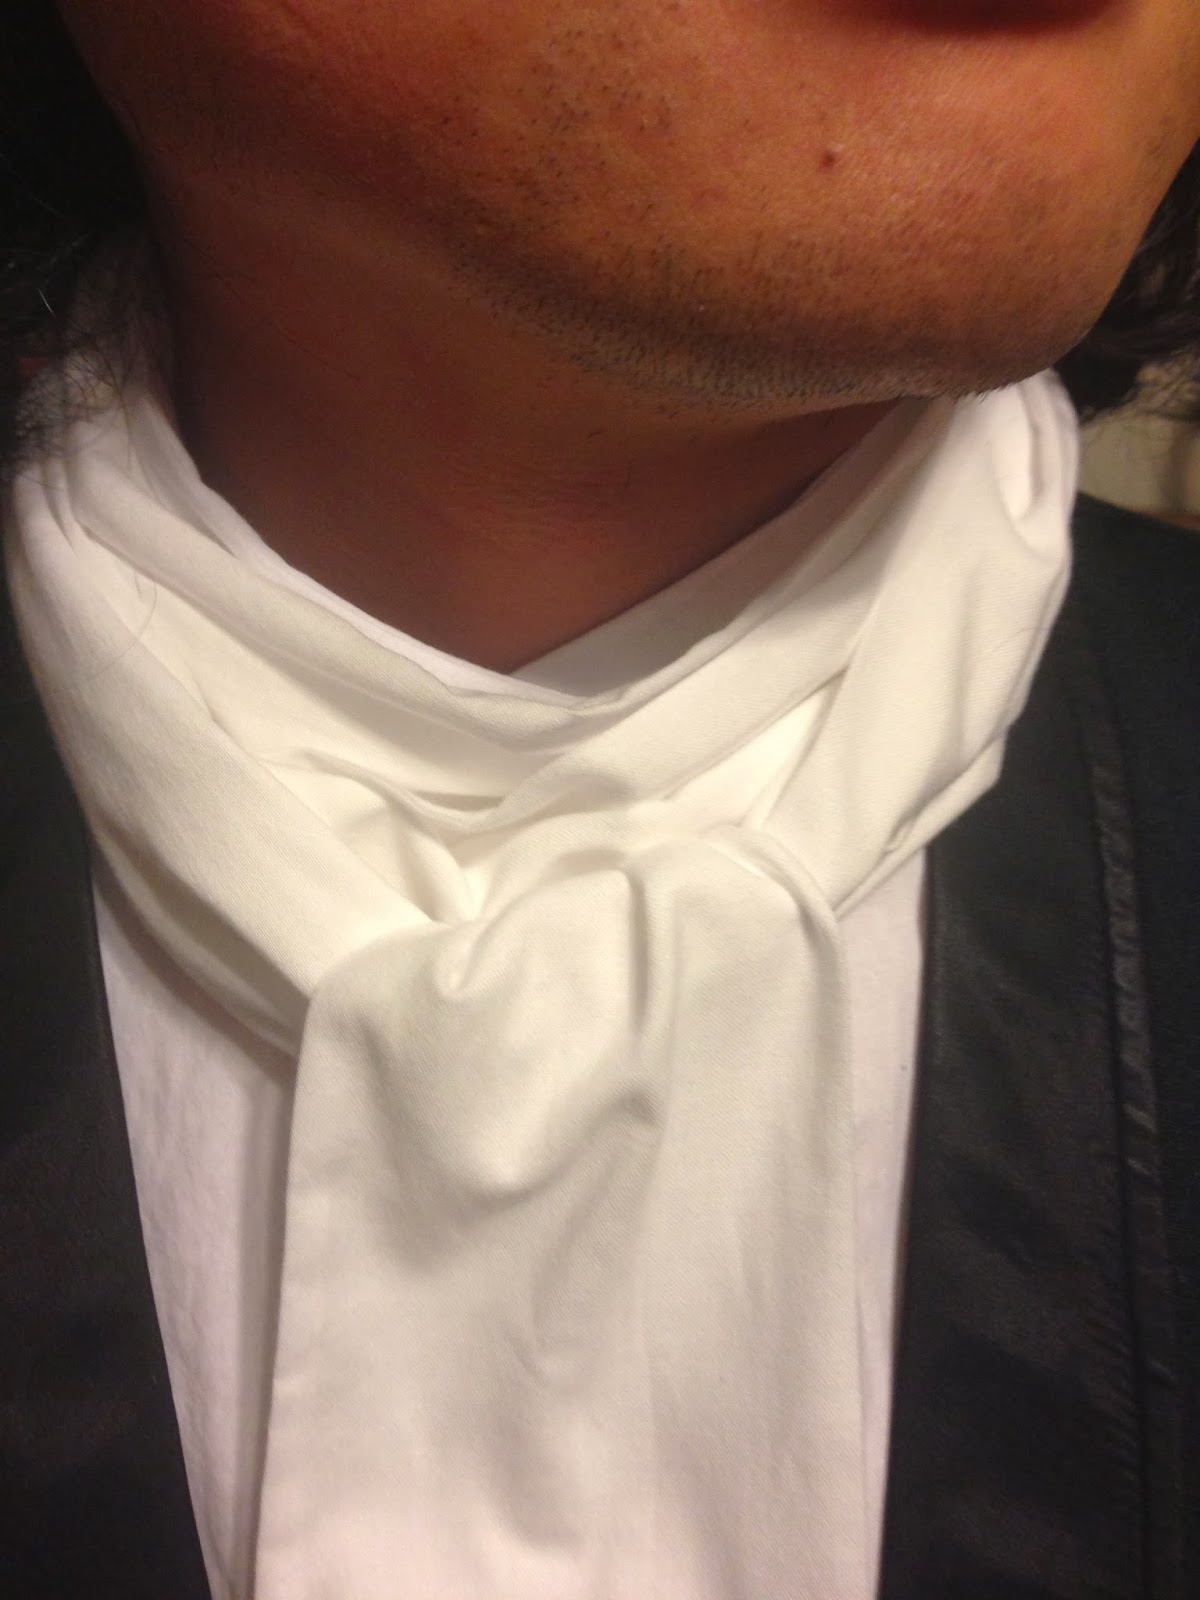
I'd been idly toying with the thought of a neck stock to give the shirt a more Regency feel (mostly because I liked the look of it) when as serendipity would have it, I was reading my morning blogs today and I ran across a lovely post by Mouse Borg Designs about making a neck stock.  So using her directions, I had a decent looking neck stock in about an hour...more buttonholes and all!


Neckstock

I do think that the neck stock under the cravat adds a lot to the look. (in spite of the fact that I didn't put much effort into tying his cravat)


 Jay in the finished shirt (and the first vest I pulled out of the costume closet just to see how it looked under a waistcoat..its all wrong for the shirt)

One thing about this pattern is that it runs very big.  (I'm used to pattern sizes being generally smaller than the corresponding ready to wear size)  Jay wears a 40R jacket so I cut the L pattern and he wasn't around when I got the shirt body together, but I was more worried that it would be a trifle snug than anything else.  If  I make it again, I would definitely size it down to a medium for him.

Another thing is that the front facing is very very long.  I cut it shorter than the pattern called for and it was still longer than I was happy with.

Fabric: white Kona Bay quilting cotton
Pattern:  Butterick 4486
Year:  Regency period although the ruffles on the cuffs are incorrect for that
Notions: thread, lightweight interfacing, 4 buttons for neck stock
How historically accurate is it? meh.  It's 80% machine sewn from a Butterick pattern.  I'm happy with it looking good for steampunk.
Hours to complete: hard to say since my time to sew has been in small "stop and start" sessions lately.
First worn: TBD.  Probably at AnachroCon in February
Total cost: $0. The fabric was from my stash and I'd picked the pattern up last year at a pattern sale at Hobby Lobby.


Monday, October 28, 2013

Lady Mary's Walking Suit (or how Pinterest made chaos of my project list)

So I had projects planned for the next few months.  I was going to knock out a shirt to replace the shredded linen one that Jay wore for Sunday in the Park.  Then I was going to make the 1940s evening dress I need for the Anachrocon dance. Then there was an 1890s skirt and shirtwaist for Anachrocon, a mid 19th century waistcoat for Jay.  And HSF challenges interspersed between projects.  This was a managable, if slightly aggressive schedule for someone who has maybe 6 hours a week to sew.

Then on my nightly Pinterest review, I came across this Downton Abbey photo.  And Lady Mary's walking suit beguiled me with it's siren song:  "Here.  Here is your next project.  Forsake all others.  I am what you really want to make."   And I was sucked in like a sailor on the rocks.


Reasons why I absolutely need to make this suit (or at least an approximation of it)

1) It would be, dare I say, flattering on plus sized me
2)  It looks simple enough to be a manageable project and yet elegant enough to be gorgeous
3)  It's trimmed with black velvet!
4)  from my VtM LARP days, I already have the black velvet gloves and a hat that will require minimal reworking
5) I might be able to get away without a corset under it

I totally need to disappear from the world for a week or so and do nothing but sew!!!

Sunday, October 27, 2013

More Kanzashi!

We're out of the hotel and back in the house...  with no furniture on the main floor, the refrigerator in the garage and left over building materials still piled up everywhere (did I mention that our contractor....  to put it politely...  has subpar project management skills?) The cats think the piles of wood are dandy, though.


But I have a sewing room again..  yay! And I celebrated by leaving suitcases packed and puttering around in it a good chunk of the weekend.  What did I make?  Despite having a laundry list of projects that need to be done, I put my kanzashi making practice to good use and made myself a hair clip using some kimono fabric that I'd bought a while ago.


It was silk or rayon crepe and I learned quickly why the book I'd been using (Kanzashi in Bloom by Diane Gilleland) specified ballpoint pins.  Using quilting cotton, dressmakers pins went through the folded petal with no problems.  The crepe was heavier and took extra mass of the ballpoint pinhead as well as a thimble to get the pin through the folds.  On the upside, having the larger pinhead made it easier to manipulate the petal in the early stages.  Note to self:  Follow the directions the first time.

I also broke down and started sewing the second row of soutache on the 1890's shoulder cape that I did for HSF #20.  I still deeply regret using the (cheap) dupioni, but I hate to waste it (and all the time I put into it) so I think I'm going to add a longer under-cloak out of black wool at some point and see if I like it better. Maybe that qualifies for HSF#1 "Make Do and Mend" in January. *hopeful thought*

I'd feel better if I could find at least one period example of using 2 different fabrics, but I may just have to decide that, despite its origins as an HSF challenge, the project is steampunk rather than historical.

Sunday, October 20, 2013

Kanzashi

We're currently living in a hotel while we have 2 levels of hardwood floors replaced from a water pipe bursting under our kitchen sink.  (thankfully, all of this is paid for by our insurance!), so I haven't been terribly productive sewing wise.

 But I brought some handwork to the hotel and I've been playing around with making Japanese kanzashi flowers.  Historically, these are the tiny tiny flowers made folding thin silk squares that are on a geisha's hair ornaments, but the book said to start with 3-4" squares as a beginner.   I also used cotton as an experiment.  (and found in the process that the crisper the cotton the better.) The tote bags are donations for an auction for breast cancer research at work, hence all the pink and white.


Once I had made a few of the larger ones, I made a few with 2" squares as hair clips for a friend's daughter.


The white and pink polkadot kanzashi was the one that I think came out the best (and was the last of the three that I made with the 2 inch squares for petals.  So feeling brave (and having a LOT of time to kill this weekend), I tried using 1" squares as petals.  And immediately went from feeling pretty confident to feeling like a hulking gaijin brute trying to make all the folds with fingers that suddenly felt like logs.  But I got one to turn out mostly ok  but I'm not sure I will attempt it again (and I have absolutely NO idea how anyone could make the folds on anything smaller than a 1" square..  or with a flimsy silk.


I have now made as many kanzashi as I know what to do with and we have another week in the hotel...  it's likely to be a looong week.

Monday, October 7, 2013

Historical Sew Fortnightly Challenge #20: Outerwear

I spent last night frantically handsewing soutache on the shoulder cape to meet the challenge deadline.  And then I tried it on and....  well, hated it. :(  Having to hem it up 4" to bring it all even to the side seams brought it up to just above my elbow and it just felt like a silly length to me.

I was frustrated beyond belief to get the #$%^ing thing finished and then end up hanging it in the closet and never wearing it because I didn't like how it turned out.  But Jay suggested that I could do something Inverness style so that it became the top of something longer.  The more I think about that, the more the idea grows on me.  Silkbaron.com has some 60" dupioni in a luscious colour called black cherry that I may need to get a swatch of.  Or perhaps a forest green.  Matching blacks would be crazy making but a contrasting colour (especially with continuing the black soutache trim) might be striking. Note to self:  do some research to see if mixing colours like that was ever done.

Lessons learned:
1) my pattern drafting is rustier than I thought.
2) handsewing takes longer than I expect (and should be done in daylight if at all possible)
3) Cheap silk dupioni looks striped.  Don't buy cheap dupioni.

 It's difficult to see the row of soutache edging the front and bottom in this picture.  My original thought was to add a second row but I ran out of time for challenge #20 and I'm not sure I like the garment enough to put the additional hand sewing time in unless I follow through on the Inverness thought.


As I posted previously, I tried to recreate the multiple tucks on the collar of an Emile Pingat cape, but I think the slubbing of the dupioni worked against me because the effect is far more subtle than I was hoping for.  To me, the tucks look too much like the slubbing to be really noticeable.

Sunday, October 6, 2013

Sunday in the Park with Jay

Had another session working on the shoulder cape yesterday.  After spending far too much time picking apart seams I had put in the last time I worked on it, I finally made some progress and I now have a finished cape with a tidy hand sewn hem ready to be trimmed.  HSF #20 ends tomorrow, so I have a lot more hand sewing to be done tonight to finish it in time.  Wish me luck!

But the weather was sunny when we woke up today, so I thought it would still be possible to go to Sunday in the Park. So I get up and start settling on my long hair piece to wear under the snood I have and just about the time I get it perfect, Jay says:  "Uh...  I figured we'd go out to breakfast before we started getting ready."  So I decide "the hell with it" and throw on jeans and a tshirt (black, of course) and we go to Waffle House, where my snood is nowhere near close to the oddest thing people are wearing.

We're talking over coffee and I mention that I hope I can get all the trim on the cape by tomorrow and Jay says:  "Well..  we could always skip Sunday in the Park..." and I think "  Hell no, I've been working on costumes for a month for this!"  and look at him closely.  "Do YOU want to skip Sunday in the Park?" I ask neutrally.

"Well...the aviators scarf I ordered never arrived, I'm afraid the outfit looks too WWII and I know you don't like the khaki camp shirt I was planning on wearing under my bomber jacket....."    (We won't talk about the three conversations we had over the course of the past month in which I suggested that we could make his outfit look less WWII and more steampunky by putting a waistcoat and high collared shirt with a cravat under the jacket and he balked at the idea.)

So we finish breakfast and go home and I drag some stuff out of the LARP box.  A battered white linen shirt I made years ago that's loosely modeled on a Romantic era men's shirt:  floofy sleeves and a high collar, a burgundy silk cravat from another shirt that I made and lost to an ex (I still mourn that shirt!) and a black man's vintage U front dress waistcoat.

The shirt is on its last legs, it has a long tear in one sleeve and another under the arm where the fabric has given out. But hey...  it's going to be under a waistcoat and a jacket.  But it looks as good as I suspected it would and better still, he likes it.  So we're back on track for going to Sunday in the Park (thankfully!)

I remember enough about wearing a corset to put my boots on first, but corset lacing is a two person job and Jay remembers nothing about what the woman showed him at Dragon Con when I bought the corset.  But we manage to get me in the corset and I resolved to 1) not to think about the mess that the lacing looked like in back and 2) find some youtube videos or some tutorial on corset lacing and put Jay thru some dry runs before our next event.

So we're dressed and off...  finally.  We had a good time wandering around Oakland Cemetery and seeing the local artisans.  Maybe 20% of the people there were dressed in costume so it wasn't too odd that we were in costume, but I still lost count of the number of times that we got stopped by people wanting pictures.  (and that's my personal benchmark for a decent costume :)  )

But it was good to get home and out of the corset.  My boots were surprisingly comfortable, even at the end of the afternoon.  Jay wasn't so lucky, but at least we know where his boots rub and can be proactive for the future.

The big takeways were:
1)  we absolutely need to do a "dress rehearsal"  before a costuming event to make sure all of the little pieces parts are taken care of.  I thought I was completely ready and didn't realize that my reticule didn't have a handle till I pulled it out to put my iphone in it this morning.
2) I need to find someway to streamline juggling a reticule, a parasol and a fan
3) I totally need a Victorian looking pair of sunglasses!


 Me in Steampunk.  Sadly, my hat is completely invisible in the picture.

 Jay as a steampunk aviator

 Random gentleman that we ran into


Jay and I with another couple we met this afternoon..and colour coordinated with beautifully!


Saturday, October 5, 2013

Target for costuming... who knew!

Spent another frustrating session on the shoulder cape last night.  I am beginning to think the whole project is cursed.  It's one step forward, two steps back all the way.  But The HSF challenge ends Monday, so I'm in the home stretch one way or the other.

The other frustrating thing is that we're supposed to have a tropical storm hit Atlanta tomorrow so there is a decent chance that it will be raining all day, so we may not even get to go to Sunday in the Park.

On a cheerier note, we were out at Target this afternoon doing responsible adult errands and we stumbled into the Halloween department.  Admittedly, there was a ton of schlock, but the real shock was that there was some stuff actually worth buying and their prices were crazy low.  Admittedly, none of it passes a historical accuracy test, but for steampunk it's just dandy.

The black velour top hats were $12, surprisingly substantial AND ran large enough to fit both Jay and I (both of us usually wear a 7 1/2 men's hat size so finding ready made hats that fit is always difficult).  I actually bought 2..  one to decorate a la riding habit and one to stay unadorned.


A black velour pimp hat.  Who could resist a black velour pimp hat?  Certainly not me!


The picture doesn't do the mask justice.  It's black metal filigree and has a rhinestones as well as the red metallic paint.  It was $15, which stunned me.  If I saw this on etsy (or at a con/ren faire) for $50, I wouldn't have blinked (I probably wouldn't have bought it, but I wouldn't have thought it was over priced).


Jay had vague thoughts of being some superhero called the Atom but the whole super hero bodysuit thing seemed pretty daunting.  (I hate working with knits) We found these "skin suits" at Target for $30.  It had an attached hood that zips over the face that will require some reworking, but it's a good starting point.

All in all it was a very pleasant surprise!  The problem is that I now own enough hats that I am really going to have to come up with a good way to store all of them.

Tuesday, October 1, 2013

So far so... adequate

The mockup of the shoulder cape went well...  even when I decided I wanted to add a high collar with detailing from an Emile Pingat 1895 cape in the Metropolitan Museum of Art (http://www.metmuseum.org/Collections/search-the-collections/159021).

The actual dupioni wasn't as painless to work with as I'd hoped.  It was a piece from a Hancock Fabrics sale, so it had enough slubbing to almost make it look striped when I put the pieces together.  That didn't thrill me, but it was already cut, so I hated to waste the fabric.

I'd also cut a pure full circle and probably should have made it slightly oval, because the length difference at the side seams really bugged me.  I swear it had hung more evenly in the mockup.  I'd been hoping for wrist length, but I know I'm going to end up hemming it up to the shortest points, which will make it elbow length.

And the collar tucks went in beautifully in the cotton mock up but gave me fits when I tried to recreate them in the silk.

Not sure this is going to be a finished garment that I am even the slightest bit happy with.


Sunday, September 29, 2013

My latest obsession: Chokha!

One of the things I love about following costuming blogs & pintrest sites is that I find out about so much that I didn't know about.  I was taking a facebook break from sewing on Saturday and someone posted an album of pictures of the Georgian national garment, the choka....  and it was obsession at first sight for me!

(there are much more interesting pictures of chokha out there but darned if I can managed to link to any of them)

I knew Jay needed one (even if he wasn't so sure) and I set about scouring the web for a pattern.  Normally, my google fu is pretty formidable but a couple of hours and the best I could come up with was a comment on the Reconstructing History facebook page asking if there were any plans for a pattern and a pic of a cutting diagram from a book (no measurements of course) from gdfalksen.com. With the limited time I have to sew  (and the amount of other projects I have planned) drafting something workable from the cutting diagram was not something I was looking forward to.  And let's not even talk about the applique on the front.  That was going to take a lot of experimentation.

Finally, I decided the chokha would have to be a long term project and decided to call it a night.  Still, visions of chokha danced in my head as I went upstairs and I decided to check out the out of print Folkwear 503 pattern for a Cossack coat that I'd bought kind of on a whim from Amazon Dry Goods a couple of weeks ago.  I vaguely remembered the coat being the same shape as the chokha..  maybe it would be a jumping off point and save me having to draft from the diagram.....

Rummaging through the men's pattern bin in the sewing room, I find the Cossack coat pattern...  and damned it I don't realize that it's not just a good starting point to work from...  it is a chokha, down to the applique on the front  (for which directions are included in the pattern).

The serendipity for this (considering that I haven't had any interest in Russian/Eastern European for years and the pattern is out of print)  is mindboggling.  I clearly should have played the lottery on Saturday.

There may be a chokha in Jay's future after all...whether he wants one or not! :)

Saturday, September 28, 2013

New Boots!

I had a pair of Victorian looking granny boots that I wore to death in my LARP days.   I loved them enough to pack in my LARP wardrobe that moved 3 times with me even though I haven't been to a VtM LARP in years.  (I came to the realization that while I loved the whole concept of LARPing..  it inevitably lead to meta game interpersonal drama that I hated more than I loved LARPing)

When we started thinking about Steampunk, I pulled them back out and realized just how battered they were.


Jay bought a pair of riding boots for his aviator outfit that needed stretched so when we went to a cobbler that was highly rated on Yelp, I brought along my beloved boots, hoping for a miracle.  What I heard was $110 to resole and reheel them and he couldn't do anything about the hole in the toe.

So it was time to think about new boots (and fast, because I'd been planning on wearing these to Sunday in the Park at Oakland Cemetery on October 6).

While I desperately wanted a pair of Tavistocks, the pure historical accuracy was almost a deterrent for me.  They were gorgeous, but I knew doing up all those buttons was going to be a nightmare. (especially since my ankles tends to be a bit thick) so Tavistocks were probably not a decent investment for me  (darn it!).  But I wanted something more substantial than the flimsy little goth-steampunk boots  I was finding (and with a heel I could comfortably spend the day walking in)


so I engaged in some google fu and came upon a company called Oak Tree Farms, who were western boot makers that did a "wedding" line.  Behold my new boots!


I'm pretty happy with them.  I wore them around the house for a few hours and they're actually very comfortable.  I know the western heel isn't entirely authentic, but I'm willing to give in on that point for shoes that I'm comfortable in all day.

And Ziyi approves of the box they came in.


Friday, September 27, 2013

Stretch Goals

So I was doing really well with having an outfit ready for Sunday in the Park.  I'd been toying with adding a late Victorian shoulder cape to the outfit, but decided not to push my luck.  Then I realized that the upcoming Historical Sew Fortnightly Challenge #20 was outerwear; it ended the day after Sunday in the Park and I had some black silk dupioni that wasn't earmarked for anything in particular.

So I guess there's a shoulder cape in my future after all!

I'm going to be "drafting" the pattern myself.  I've made enough full circle cloaks in my SCA merchanting days that I should be ok.  *crosses fingers*

Thursday, September 26, 2013

Black velvet Steampunk arm garters

These were a little side project for my Steampunk chemise.  Historically accurate?  Not for women. Still, they were a fun little bit of fluff to make and I love multiple textures of a single colour.   *ponders*  and it would look also look good against a red or burgundy chemise....   and that would mean I would need another corset.....  :)


Sunday, September 22, 2013

The Saga of the Chemise

So I had a red silk corset that I  bought at Dragon Con to use for a Steampunk outfit.   What was I going to wear under it? That was the million dollar question.

After looking at a lot of pictures of women's "Steampunk" fashion on Pinterest, I decided that an achievable goal would be a chemise..  more Ren Faire than pure Victorian, but I had recently become enamoured of both Regency "Marie" sleeves and some sleeves in Alexander McQueen's pre-fall 2013 collection.  (and hey...  if I am going to radically mix periods like that, why do it half heartedly? :)

from Alexander McQueen's pre fall 2013 collection

Marie sleeves

I wore Italian Renaissance when I was in the SCA and I had made many, many renaissance chemises. This project would be a snap, even messing about with the sleeves!  (I should have known then that those would be famous last words)

I bought a cotton/linen blend from denverfabrics.com and was pretty happy with how it washed up (altho it was nowhere near the "handkerchief" weight it was listed as)  and figured that I could knock this out in an evening or two.  Unfortunately, this was a project that just didn't want to play nice.    But I finally got it to a point that I could live with the look of the finished garment (as long as I didn't think about the fixes I'd had to implement to correct issues during construction).  At some point I know I'm going to end up re-doing the whole thing, but it's something to wear to Sunday in the Park.


Sunday, September 15, 2013

Every girl needs a pretty hat

Now that I had a top hat, I was determined to dress it up.   But I didn't know exactly what I wanted to do with it.  I had a bunch of millinery trimmings that I'd collected over the years, but there were just too many choices.  Did I want to use the black tulle, the coarser netting or the Russian millinery veiling? Feathers?  Were feathers and something else too much with the tulle?

Finally, I just decided to play until I got something I liked.  Ironically, I gave up that night, completely unsatisfied.  But when I took a look at it the next costuming session, I found that I liked what I'd come up with very much.


Saturday, September 14, 2013

Serendipity..twice

Since AnachroCon is over Valentine's Day weekend, they announced that they were going to have a 1940s swing dance and dinner event.  Swing dancing...  yay!    1940s costume, not so much.  I've never really cared for the 1940s look.  But ok... the next goal after Sunday in the Park is a 1940s dress.

Jay wanted to be iconic and dress as a sailor and have me dress as a 1940s nurse, but AnachroCon was using that picture in their promotions for the event, and I didn't want to be one of a dozen couples that had that "brilliantly original" idea.  (and I wasn't terribly keen on a nurse's uniform anyway)

Reconstructing History had some 1930s patterns (RH1314 and RH1319) (hey..  if I'm going to make something I have to at least like it, right?)  and a longer 1940s dress (RH1409) that had some promise but when I think of the 1940s, I think of prints, However, my google fu was weak and I was just having no luck finding anything that looked like a 1940s print in anything but quilting cotton.

Oh well, I decided to back burner the project at least until after Sunday in the Park.  Then I was in Gail K (the one decent fabric store I've found in Atlanta) and the woman cutting my fabric mentioned that they had a brand new store in Norcross (the suburb I happen to live in!)

So, of course, I had to check it out.  And lo and behold, what did I find in the middle of a rack of sari silk was this:

It had a retro 40s vibe, colours that weren't awful, a great hand (and a nice substantial feel..this wasn't flimsy blouse weight stuff) to it and better still, it was silk and not rayon.  Best of all, since there was a rip in one end and some fading, I got it for $8 a yard.  Sold.  I took the whole piece because it wasn't something I was likely to ever find again.

Monday, September 9, 2013

Trimming the skirt (or when to leave well enough alone)

It wasn't exactly buyer's remorse, but the skirt I bought at Dragon Con had some flaws.  The zipper (which was set in well enough) was a huge plastic coat zipper.  It was honking huge, but on the upside, this thing was never ever going to break.  It was just that sturdy)

The ruffles at the bottom of the skirt were also finished with a serger stitch that I wasn't thrilled about.   But I decided I could cover the serging with some trim and it would be OK.

Except that trim was a dark charcoal grey and not black, which brought into clear perspective the fact that the ruffles were nowhere near even lengthwise.  *sigh*  Without the trim, I hadn't even noticed.

But it would work until I got something better made (which would be after Sunday in the Park).


Monday, September 2, 2013

Afternoon at Dragon Con

Jay and I both ended up sleeping late (we'd taken the day as a vacation day, after all) and by the time we'd had brunch and were heading downtown, it was early afternoon.  The badge line for on site registration was much less arduous than the last time we were there and we had badges in about an hour.  We also pre-registered for next year so we can plan better next time.

Coming out of registration, we happened upon a table for AnachroCon, a local alternative history/Steampunk convention happening in February.  To give us another costuming goal to work towards, we pre-registered for that.  So 1 outfit for Sunday in the Park and another 2-3 for AnachroCon in February.  I can do this!

We agreed our first stop was the dealer's room....  well, building (there were at least 3 whole floors of dealers!).  Fighting the mad crowds through the first floor we saw many wondrous things (and, to be honest, a lot of junk)

Jay found a grey wool German officer's jacket that looked so good on him we had to buy it, although we have no immediate use for it, a brown leather officer's hat and a pair of goggles for his aviator costume.

I found a black leather top hat and a pair of opera glasses, but was decidedly unimpressed with any of the corsetry I was seeing for sale...  it was all rather flimsy and marginally constructed.  With about 30 minutes left until the dealer's room closed I ran across a booth for a Philadelphia fetish-ware store called Passional in the back corner of the 3rd floor.  The owner clearly knew her corsets and answered my  "tell me about your corsets" by telling me how many bones were in each one and that the bones were made of spring steel.  Before I knew it, she had me in a gorgeous red silk corset with spring steel boning that I knew was going to go home with me and a black ruffled hobble skirt that was too fun to resist.

By the time the dealer's room closed, we were starving.  After taking a look at the crowds at all the restaurants, we decided  that we were getting old and we really wanted to just catch MARTA home with all our loot and eat somewhere less crowded. So we did.


Sunday, August 25, 2013

Sunday in the Park

So Jay and I decided sort of last moment to go to Dragon Con for a day next weekend..  of course, too late to do anything but go in mundane clothes.  (Right now the costume closet consists pretty much of a bunch of VtM LARP stuff I don't fit in any more and some kimono from our days LARPing L5R)

But we did decide that our first costuming goal was Sunday in the Park at Oakland Cemetery in early October.

Sunday in the Park is an annual  "Victorian Street Festival" that's been going on in the historic Oakland Cemetery in downtown Atlanta since 1979.  We went last year but didn't dress so this is a good first costuming goal.  One outfit for each of us and 6 weeks to manage it.  I can do this! (I hope)

Some pictures of beautifully dressed strangers from last year's Sunday in the Park


Saturday, August 24, 2013

Kimono and other things Japanese

A couple of years ago, Jay and I got involved in a living campaign for Legend of the Five Rings (L5R) roleplaying game, which has a fantasy feudal Asian setting.  The thought of looking like a sausage an modern Kimono and obi was what initially motivated me to buy a sewing machine again and clear out a spare bedroom for a sewing room.

After doing a lot of research, I came across this picture (I don't remember the source at this point) and realized that the juni-hitoe of Heian period Japan was my salvation.


Better still, I found that Reconstructing History had patterns to make the whole outfit! I made the mistake of not using natural fibers for the first attempt and immediately regretted it.

But Jay and I had the opportunity to go to Taiwan for his cousin's wedding several years ago and here is attempt #2 done in some of the luscious silk brocade that I picked up for (I kid you not!) $7 USD a yard!  The Yong Le market is a fabric nirvana.  I ended up bring back 84 yards of silk brocade (and had to buy another suitcase to get it all home)


The finished outfit (with Ziyi photobombing the picture)

Fabrics:  all 100% silk
Level of historical accuracy:   Nominal.  I was going more for the feeling of the art in the game books and CCG cards that pure historical accuracy.

Shape and lines of of the kosode (under robe) the nagabakama (pants) and the uchigi (robe) are accurate.  I've read some research that suggests that the authentic fabric would be a lighter weight silk, more like organza (since the uchigi were layered on top of each other to as many as 12 worn at a time.  (juni-hitoe leterally means twelve layer robe).  And the L5R game has very specific colours assigned to each family, so I was pretty much stuck with turquoise and white.

I have a second uchigi cut out to use the other side of the fabric (gold with a turquoise design) that I planned to use as an under robe.  But we stopped enjoying the campaign and fell out of playing, so I never got it finished.

Thursday, August 22, 2013

My costuming philosophy

While I am a firm advocate of research (and could and do spend hours researching)  what I really enjoy is the "design" part -bringing the look I imagine to life and recreate it exactly. Whether it's an actual extant dress or something that only exists in my head.

And I'm getting back into costuming because I enjoy it.  I have a high stress "real life" job and costuming is a relaxing activity I get to indulge in a couple of evenings a week.

This time around I want to play with fabrics that please me and occasionally dress up in pretty outfits that I've made/ designed. The historical accuracy will probably vary wildly from project to project.

I will probably never completely hand sew a garment.

I will probably buy things like corsets because I can find good ones and I don't find corset making fun. (I did it for my thesis project...  it's a beast and really its own art)

I will probably rip out as many seams as I sew while I'm remembering things I haven't done in years.

I may get brave and try to recreate a certain black and pink Worth dress that has remained in my head for years.  

But I will have fun doing it.

Wednesday, August 21, 2013

My furry assistants

Every costumer needs a cat to interfere with  assist them in their endevours.  Well, I have 4.  Mercury, Ziyi, Miyuki and Samuel L. Catson (Sam)

Miyuki couldn't care less about the sewing room door opening.  She can't be arsed to wander upstairs to inspect.


Mercury is nominally interested in the sewing room.  If I've been in there "too long" he will wander in and meow until I stop and reassure him with some petting.


Ziyi, on the other hand,  finds something both fascinating and unsettling about that door opening and me being in "that strange room that only appears sometimes."  She needs to keep a close eye on me when I'm in there and frequently demand attention, scolding me till I stop what I am doing and pet her.


And then there is Sam.  Sam also needs a lot of reassurance when I am in the sewing room.  Only he launches himself into my arms from the ground, which can be rather awkward when my hands are full of fabric.  Sam also loves  sabotaging  helping me cut out pattern pieces.    To Sam, if it moves, it's a toy!


Thursday, August 15, 2013

My Sewing Room


We are lucky enough to have enough space that I have a whole room devoted to collecting fabric..err  sewing. Below is my storage wall, complete with Lucy, the 1914 dummy who I found for  $100 in an antique store in college and who has traveled with me ever since.  The sign is from my old SCA business and the poster is from a Cleveland Ballet production that I actually worked on.


My idea boards.  Full of things that interest me, project pictures and the occasional oddity that has no other home.

My Bernina, and my research shelves (that also house my collection of Maneki Neko and my collection of Rabbit (from Pooh) )


Unfortunately, there is not room for a cutting table so I have to use our dining room table. Which is at least, nice and long, altho I long for a real costume shop style homosote table covered in muslin that I can stick draper's pins in to hold patterns down.