This post is very tardy. I finished the apron on time for the February challenge, but was out of town for work for a week, so I am just now getting the blog post written up
My original plan was to do a make a new Italian gown to wear for Midwinter Arts & Sciences in February and use for the "Pleats and Tucks" challenge since the skirt would be pleated to the bodice and 16th century gowns often have a tuck at the bottom. Except that I kept waffling on a clear concept and nothing got started.
So with half of February already gone I decided to make an apron to go with my late 16th Italian working class gown. It wasn't an brilliantly exciting project, but it would have pleats and I'd been thinking about making one for a while (Too many projects, too little time!)
I'd read a little about smocking at germanrenaissance.net and pleatworkembroidery.com and I'd always been meaning to try my hand at smocking, so I decided on an apron with some simple smocking on it.

Both sites had what seemed to be solid references for their information (including a fascinating article on How to Pleat a Shirt in the 15th Century discussing extant garment fragments from Lengberg Castle) I used the apron tutorial from germanrenaissance.net in lieu of doing my own research but I did learn a few things. Smocking is more of an 18th-19th century term; the German word is "fitz-arbeit" (literally pleatwork) and pleatwork seems to be the more accepted term for it in the reenactment circles. It was especially popular in Germany, Italy and to a lesser extent England in the late 15th - early 16th centuries and can be seen on collars, cuffs and aprons in paintings and engravings such as this one (her apron has pleatwork at the top):


My original plan was to do a make a new Italian gown to wear for Midwinter Arts & Sciences in February and use for the "Pleats and Tucks" challenge since the skirt would be pleated to the bodice and 16th century gowns often have a tuck at the bottom. Except that I kept waffling on a clear concept and nothing got started.
So with half of February already gone I decided to make an apron to go with my late 16th Italian working class gown. It wasn't an brilliantly exciting project, but it would have pleats and I'd been thinking about making one for a while (Too many projects, too little time!)
I'd read a little about smocking at germanrenaissance.net and pleatworkembroidery.com and I'd always been meaning to try my hand at smocking, so I decided on an apron with some simple smocking on it.
Different types of smocking stitches
Both sites had what seemed to be solid references for their information (including a fascinating article on How to Pleat a Shirt in the 15th Century discussing extant garment fragments from Lengberg Castle) I used the apron tutorial from germanrenaissance.net in lieu of doing my own research but I did learn a few things. Smocking is more of an 18th-19th century term; the German word is "fitz-arbeit" (literally pleatwork) and pleatwork seems to be the more accepted term for it in the reenactment circles. It was especially popular in Germany, Italy and to a lesser extent England in the late 15th - early 16th centuries and can be seen on collars, cuffs and aprons in paintings and engravings such as this one (her apron has pleatwork at the top):
Albrecht Durer
Melencolia I
1514
While white aprons were the most common in the era, there are some examples of colored aprons in paintings such as Campi's The Fruit Seller.
Vincenzo Campi
The Fruit Seller
1580
Since my current gown is based on a Campi painting, I decided to use some sea glass green linen I had on hand. (Fabric-store.com calls it "turquoise" but its really a lovely winter sea color.)
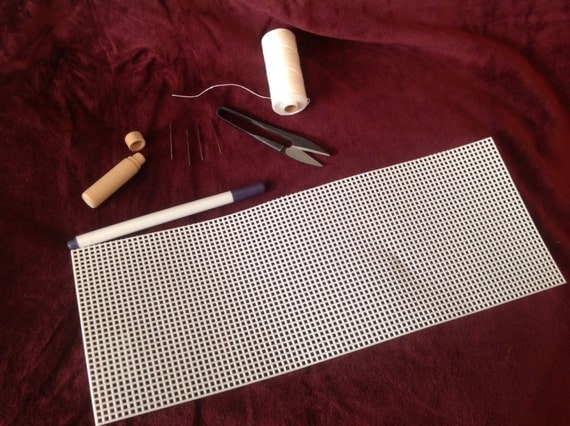
The tutorial provided (what I thought was) a handy template for placing the dots on the fabric but the prick and pounce method of transferring the dots was a complete fail.

the template from germanrenaissance.com

Sam supervising me punch a whole lotta holes in the template
While I finally got the transferred with a fabric marking pencil, I knew if I ever wanted to do more pleatwork (and I was pretty sure I did) I knew I'd need a better method. So I picked up a smocking kit from PimpYourGarb on Etsy. I haven't used it yet, but it looks infinitely easier than my current template.
Smocking kit from PimpYourGarb on Etsy
Once I had the dots on the fabric, the actual apron went together pretty easily. So easily in fact that I forgot to get process pics. Hem the three edges of the fabric without the dots run gathering threads through each row of holes, gather into pleats and smock. I used a honeycomb stitch which consists of stitching the first 2 pleats of the top row together with a few small stitches then the 2nd & 3rd pleats together at the second row, the 3rd & 4th of the top row, et al for each 2 rows of gathering threads. (the tutorial I linked above does a much better job of explaining the technique) Once it was smocked, I put on the waistband and voila, the apron was complete.

The finished apron

Closeup of the smocking
I learned a lot from this first attempt and reading a few more tutorials. In retrospect, I'd add more rows of dots so the smocked section was deeper and I'd probably use a 1/4" grid for the dots. But its definitely a technique I enjoyed playing with and I plan to do more of. In fact, I am sorely tempted to do v2 of the apron for the protection challenge this month.
The Challenge: #2 Pleats and Tucks
Material: Linen
Pattern: From http://germanrenaissance.net/wp-content/uploads/2013/10/Honeycomb-Pleatwork-Apron-Class.pdf
Year: This style of apron can be seen in paintings, woodcuts, etchings from the 14th - early 16th centuries.
Notions: Poly thread (I thought I had linen thread of a similar color but I didn't)
How historically accurate is it: 60%? The end product is visually similar to various paintings, etchings and woodcuts from the 14th -early 16th centuries. The proportions are similar to several extant late 16th- early 17th century decorative aprons in the Art Institute of Chicago and the Met. The extant aprons linked above are made of linen so a case can be made for linen being historically accurate. But there have been multiple comments on the Elizabethan Costume group that wool would be more appropriate for an apron for the simple fact that the risk of it catching fire is lower. To be honest, I haven't done enough research to know if wool would be more accurate for a working class apron or not. All the stitching on it was done by hand; however, the thread is inaccurate and the method of transferring the dots is decidedly modern.
Hours to complete: 6-8. At least half of it was punching holes in the template, enlarging holes in the template and finding a successful method to transfer the dots.
First Worn: February 27 at the Meridian Challenge of Arms
Cost: $0. Everything was out of the stash.
Thank you for the additional details! Funny, I never noticed that Dürer print featured an apron... I guess that's something you're far likelier to notice if you'd already given the clothing some thought.
ReplyDelete