Saturday, July 16, 2022

Royal University Meridies July 16, 2022

I taught two classes at Royal University Meridies today.   I've updated the files on my Islamic/Italian Influence page and the Classes/Papers page, but here are the links for easy access.


Islamic Influence on Italian Textiles v 1.75  (last taught Royal Meridies University 2022)
A discussion of some of the ways the Islamic World influenced textile motifs that have come to be known as "Italian".

Basic Italian Hemstitch 3.0 (last taught Royal Meridies University 2022)
Instructions for the basic drawn thread hemstitch and a variation as well as examples of its use from 15th & 16th-century art. 

Monday, January 3, 2022

Great Meridian Bake Along Challenge: Period Recipe in a Period Table Setting

 I am a casual participant in the Great Meridian Bake Along.  I don't have time to do every challenge, but this week's challenge was "A Period Bake in a Period Tablescape" and I have one day left of vacation.  Since I collect (hoard?) reproductions of 16th century Italian tableware and linens and have a shelf of historical cookbooks, everything seemed serendipitous.

My recipe was marzipanned tourte (VI 120) from Scappi's Opera1 using a loose web redaction2 I've had forever. The recipe is from Book VI of the Opera: Dishes for the Sick and Convalescent.  I admit to being a bit lazy on doing my own redactions -the fun for me is in the cooking and eating of historical recipes rather than puzzling out the redaction.

The dough mentioned in VI 120 was "a sheet of pastry as above"1. VI 118 is the recipe that actually has the dough: "...made of fine flour, egg yolks, butter, salt, sugar, and rosewater."  I used Stirler's redaction for the amounts of each ingredient and the dough came together easily.  My only change was that I had a bottle of rose-almond water already open so I used that rather than pure rosewater.  Since the filling included almond paste, I thought it was a reasonable substitute. 

The almond paste in Scully's translation is: "get a pound of shelled almonds and grind them thoroughly in a mortar. Have a pound of melted sugar boiling in a casserole pot and put the almonds in it until they become a paste. Put it back in the mortar and grind it up again. 

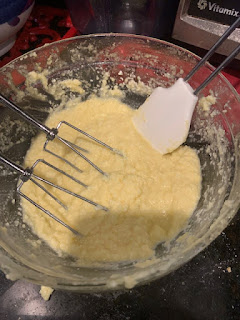
Stirler's almond paste calls for 2 ounces ground almonds, 3 ounces sugar, 1 egg and one ounce of butter. I used almond flour since it is essentially ground almonds. The end product was loose and despite extensive beating, lumpy.  But since it was going to be filling, I didn't worry about the lumps (too much).

The next part is where Scully and Stirler really diverge. Per Scully: "when it (the almond paste) has cooled, add in six egg whites and a beaker of milk made from melon seeds." The "milk made from melon seeds" threw me and I didn't want to get derailed researching it, so I ran with Stiler's redaction for this part.  In  retrospect, I suspect almond milk might have worked.  I'm pondering marzipan for Baroness Isabetta's Vigil table next month, so I may go back and revisit Scully's translation soon.

Stirler mixes the almond paste with: "1/2 c pastry cream or 1 vanilla pudding snack cup or 4 oz of cream cheese or 1/2 c ricotta cheese."2  I shuddered at the thought of using a vanilla pudding cup and went with ricotta cheese.

Hmmm...  am I going to have enough filling?

Stirler and Scully also diverged on what to do with the filling.  Scully says put it a torte pan lined with a sheet of dough.  Stirler says to cut the dough into 24 rounds.  Since it was more in line with Scully, who translated from the original Italian, my plan was to make a single torte.  However, since I did not have enough filling for a torte or ingredients to make a second batch of filling, rounds it was going to be!  From this point on, I would be following Stirler's redaction.

But is this enough dough for 24 rounds?

Rolling to 1/16th of an inch got me eleven 4" rounds in the first rollout. Rolling out the leftovers 2 more times, I ended up with a total of 16 rounds.  Stirler said 24 rounds but I don't see any way for that to happen.  1/16th of an inch is the absolute thinnest I could roll the dough and rounds smaller than 4" would be really difficult to work with.

Leftover dough after sixteen rounds

I used a teaspoon to fill each round and then folded it over, sealed it with water and cut slits in the top in a vaguely decorative pattern.


Ready for the oven!

I baked them at 420 degrees for 13 minutes, then brushed them with an egg glaze and put them back in for 5 minutes, as per Stirler.  If I make these again, I think I'd keep them in a few minutes less.  They weren't burnt, but they were a bit browner than I wanted.

I  think my oven may be a bit hotter than Stirler's

The finished pastries were slightly sweet but rather bland -I can see why Scappi included them in the cooking for convalescent section. I think they needed more filling, but even just using the teaspoon I did, it threatened to ooze out the sides.  And larger rounds would increase the amount of pastry not just the room for filling.

But now that I had my pastries baked, onto part two of the challenge:  the table setting.

Table settings are my joy.  I have large quantities of photos of extant silver, glassware, ceramics and linens from museum trips and portraits- it's a long term casual research project. I love creating a historically accurate table for when we sit feast or I do a hospitality or vigil table.  And I enjoy seeing how I can up my game. (Or perhaps I just can't resist adding to my collection *blush*)

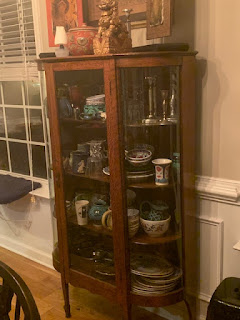
So I had plenty of props to play with....plenty of props.

The tableware cabinet

The table linens collection


Since my focus is third quarter of the 16th century in Venice (and Constantinople) my mind went immediately to still life or "Natura Morta" (dead nature) paintings, as the Italians called them.  Dutch still lifes are what most people think of when they hear "still life painting," but Italy  also produced notable still life painters, including Caravaggio.4


Still Life with Fruit and Carafe
c1610-20
Pensionante del Saraceni
National Gallery of Art, Washington DC
Accession Number 1939.1.159


Still Life 
c1625-30
Georg Flegel
Metropolitan Museum of Art
Accession Number 21.152.1


Still Life with Fruit on a Stone Ledge
c 1601-10
Caravaggio (attributed)
Private Collection

While the seventeenth century was the golden age of still life paintings,  still life motifs can be seen in      15th century & 16th century art3, so I decided to set the table as a Natura Morta display.

I spent the afternoon and evening rummaging around in my dishes and linens to find the best options, then taking dozens of pictures, in daylight and various types of artificial lighting, and endlessly moving things a fraction of an inch this way and that.  Oh  and keeping the cats from interfering too much.

Sam, you are not as helpful as you think you are

Until I found the composition I was happy with.


It was actually a lovely way to spend my last day of winter vacation.

--------------------

Scully, Terence trans. The Opera of Bartolomeo Scappi (1570). Torento: University of Toronto Press, 2011.

Stirler, Gael.  "Three Recipes from The Opera of Bartolomeo Scappi (1570)https://stores.renstore.com/food-and-drink/renaissance-treats#.Vy1Msr5Ggqg  Accessed 3 January 2022.

Liedtke, Walter. "Still Life Painting in Northern Europe: 1600-1800"  Metropolitan Museum of Art Heilbrunn Timeline of Art History. https://www.metmuseum.org/toah/hd/nstl/hd_nstl.htm  Accessed 3 January 2022.

--- . "The Origins of Still Life in Italy" https://galleriaborghese.beniculturali.it/en/exhibition/lorigine-della-natura-morta-in-italia-caravaggio-e-il-maestro-hartford/# Accessed 3 January 2022.

Sunday, September 13, 2020

Experiments in Gaufrage

Several years ago, at the Jamestown conference, I had the opportunity to take a class on heat stamping patterns on fabric with Ninya Mikhalia of the Tudor Tailor. Her husband had made her the tools we were using in the class. It was great fun and I wanted to play with it more. When I got back home, I tried to find a way to make my own stamps, but I am not handy in the ways of metal and wood and it was never a project I made any significant progress on. And I am easily distracted by the Next. Interesting. Thing. so it fell by the wayside.

Recently, I was on the Tudor Tailor Etsy shop chasing one rabbit hole or another, and lo and behold, they are now selling sets of stamping tools! Sending thanks to the universe for having a good job (because they were not cheap), I bought a set and waited impatiently for the tools to arrive from the UK. They arrived this week and this weekend I got to play with them.


They came in a set of three: two flowers and a rectangular design.


They heat on a hot plate.


First attempt:  Silk Taffeta. I was excited to see the dark impression until I realized that it had shattered the taffeta in one spot. I'm pretty sure that the stamp was too hot.


Try #2:  cheap, slubby silk dupioni. Noticeable but definitely not as clear as the taffeta. I stamped left to right and there is a distinct softening of the edges between the first flower and the third.


Try #3:  Same taffeta, slightly cooler stamp. I really wanted to love this stamp, but I don't, although, after a little more experimentation, I managed to make end-to-end stamps flow together more smoothly.


Try #4:  Wool.  Not a bad result.


But try #5 was the clear winner.  Cotton Velveteen.  Absolutely gorgeous result!  My immediate thought was:  "What can I make out of velveteen that needs stamping?!"


I can see a variety of fun uses for them, however, stamping an entire pattern piece would be a really time-consuming process.  Each heating of a stamp provided 3-5 motifs before I needed to reheat the stamp for 5 minutes.  It would be easier with 2-3 sets of tools to rotate through, but that is a crazy amount of money to spend (even for me).  Must think more about how to solve this.

Now I am off to chase down more information on this technique in 16th century Europe.  I've found an article by a Turkish scholar (which deserves its own blog post) who says the technique originated in Turkey in the 15th century and was exported to Europe and India. And there are quite a few extant 16th-century Ottoman garments that use the technique. I know I've seen extant European garments with this technique (and Tudor Tailor wouldn't be selling the tools if there wasn't solid information out there...  so I guess my first step is to look at their books!)


Sunday, August 16, 2020

Part II: Creating the Button and Loop Closures on a Kaftan

I initially thought that the button and loop closures were for solid colored inner kaftan.  But in going back and looking at extant kaftan, I saw examples of elaborately patterned silk kaftan with button and loop closures.
detail of caftan, mid 16th century
Topkapi Sarayi Museum, Istanbul  13/38
Photo from A la Coeur du Grand Turc

And IPEK says that "inner kaftan were fastened with narrow bands of fabric in matching rows on either side of the front closure..." (IPEK 200) This sounds very much like a description of Ã§haprast, which I will discuss in part III.  So my theory that simpler kaftan = simpler closures is definitely not correct. 

At present, I cannot even hypothesize as to how the decision was made to use button and loop or Ã§haprast on a particular kaftan. But I have seen button and loops on enough kaftan to be comfortable saying that it's a historically accurate method of closure.

Buttons and Loops: How the Ottomans Might Have Done It

There are three sources I have found (so far) that detail kaftan construction:

Arnold's 1968 article on a kaftan of Selim I (Topkapi 12/4415). This particular kaftan has çhaprast closures, so it's no help determining how the loops were made.

Jennifer Wearden's "The Royal Garments: Fabric, Design, Tailoring in Hali Magazine issue 51 discusses the construction of the V&A collection as a whole.  The only remark that she makes about loops is: "one example fastens into simple loops stitched into a seam." (Wearden 138)

Millicent Ryan's photos and commentary from her study visit with V&A kaftan 257-1929, 773-1884, 753-1884, 772-1884, 768-1884, and 766-1884. Many of the V&A kaftan are single panels rather than full garments and of the complete kaftan that she looked at, all had çhaprast closures rather than button and loop.

So what follows is my conjecture and attempt to create plausible loops visually similar to the teardrop-shaped loops seen in extant examples.

detail of caftan, early 17th century
Topkapi Sarayi Museum, Istanbul  13/305
Photo from A la Cour du Grand Turc

You can use this method whether the left front gore is cut as a single piece or if it is cut separately.  However, I find that the seam is quite helpful in making sure the loops line up beneath each other.  Plus cutting the gore separately is more fabric efficient.

The pictures here are from a red taffeta kaftan that I made several years ago.  Full disclosure:  the loops are on the right and the buttons are on the left. This is reversed from the Ottoman way of the loops on the left and buttons on the right.  I unintentionally reversed them during construction and discovered the fact too late to correct the error.  The good news is that this error has indelibly burned "Loops = left" into my brain.

Once the kaftan was mostly finished (including buttons sewn on at the desired spacing), I used a tapestry needle and #3 cotton crochet thread and 
  • Came up through the lining
  • Looped the crochet thread around the button
  • Took the needle back into the lining on the other side 
  • Made a little tack at the bottom of the loop 
  • Ran the thread down to where the next loop needed to be 

All the loops were made with a single thread.

I think the end product looks similar to the loops on the extant kaftan. However, over time and repeated wear, the loops have stretched a bit, despite the tack stitch to keep them in place.  Looking at extant kaftan, that might even be historically accurate.  But it annoys me disproportionally and I want to find a way to solve that.


Lesson learned:  when I put the facing on, I pinned the point of the triangle flush with the top center edge, not taking into account seam allowance.  As you can see in the picture below, this caused the gore to start approximately 1" from the top (1/2" seam allowance on the gore to front seam and 1/2" seam allowance for the front facing.  Next time I will probably cut the gore 1" longer and allow that extra inch to extend higher than the neckline, and trim off the excess when I bind the neck.


Buttons and Loops: the Easier Way

If 100% historical accuracy is not the primary objective, the easiest way to create the loops is to use bridal loop tape. This method works best with gores cut separately from the front piece so that the loop tape is set into the seam between the front and front gore.

Bridal loop tape is ~$2 a foot on Etsy and wildly overpriced on Amazon.  I can't comment as to whether Joann or Hobby Lobby carry it as I don't shop at either store.  It comes in white, occasionally black and very, very occasionally other colors.  (I found some red & turquoise in the NYC garment district once and have never seen any again)  One yard should be enough loops for at least 2 kaftan, depending on where you want the buttons to stop.

There are two types of loop tape:  elastic and non-elastic.  The loops on the elastic tape will stretch out of shape over time; the non-elastic loops will not. I recommend the non-elastic. The first few kaftans I made, I used the elastic tape and I have since had to go back and replace the closures.

 I've found 2 spacings of the pre-made loops.  Some tapes have the loops spaced approximately 1" apart.  Other tapes have the loops closer together.

The Ottomans tended to love their buttons, so I prefer the closer spacing, especially with Bad Baroness's 8mm ball buttons


 Many many buttons!
excerpt of folio 16.a

Album of the World Emperor c1610

Topkapi Sarayi Museum, Istanbul Bagdat 408

photo from: The Album of the World Emperor


However, you also see wider spacing on extant kaftan. So it's really personal preference.


detail of caftan, second half of 16th century
Topkapi Sarayi Museum, Istanbul  13/9
Photo from IPEK

 You can trim loops off of the closer spaced tape if you want wider spaced loops or fold the wider-spaced tape in half and zigzag down the tape itself to create a closer spacing. Lots of possibilities. However, you will want to confirm the buttons you are using will fit through the loops before you put the loop tape in.  Don't ask me how I know this. :)


Sewing the tape into the kaftan

Put the loop tape along the edge of the left center-front piece with the loops facing AWAY from the center. I often hand baste them in place, because if you are using a sewing machine in the next step, the presser foot going over the tape can make everything wiggle a bit. But I am a belt and suspenders sort of girl, so you may not find basting necessary.


Put the gore on top of the loops and pin everything securely.


My Western European sewing experience says at this point:  "No!  Put the bias side against the straight grain center front for stability! That whole diagonal will ripple if you don't."  If you are using linen or a more loosely woven fabric, you probably should. But when you look at the number of extant kaftans with the front and gore cut in a single piece, they did exactly that.  And because of (I suspect) the stiff nature of most Ottoman fabrics, 500+ years later, that edge is still straight.

Once you get the gore sewn all the way down, open the two pieces of fabric like a book and press the seam open and the loop tape flat.  Behold, you have a tidy row of loops! 


Most of the extant kaftan have the buttons sewn to the very edge of the front.  You may want to keep this in mind when sewing your buttons on. 

detail of caftan,16th-17th century
Topkapi Sarayi Museum, Istanbul  13/553
Photo from Style and Status

Next installment:  Ã§haprast closures.

_______________________________________
Arnold, Janet. “A Caftan, said to have been worn by Selim I (1512-1520)”. Costume, Vol 2. 1968.

Atasoy, Nurhan, et al. IPEK: The Crescent and the Rose: Ottoman Imperial Silks and Velvets. Azimuth Publications, 2000

Fetvaci, Emine. The Album of the World Emperor: Cross-Cultural Collecting and the Art of Album-Making in Seventeenth-Century Istanbul. Princeton University Press, 2019.

Maury, Charlotte ed. Al la cour du Grand Turc: Caftans du Palais de Topkapi, Louvre Editions, 2010

Ryan, Millicent. Journey to the Clothworkers' Centre.  self-published, 2018. <https://sites.google.com/view/melikebintnikola/ottoman-clothing-textiles?authuser=0>

----.  Style and Status:  Imperial Costumes in Ottoman Turkey. Azimuth Editions, 2005.

Wearden, Jennifer. "The Royal Garments: Fabric, Design, Tailoring" in Hali Magazine issue 51. June 1990.


Sunday, August 2, 2020

Part I: A Brief Overview of Gores and Closures in Extant Kaftan

This all stemmed originally from Captain Natalya asking me about kaftan closures because she was making a new fencing kaftan, but I thought it might be of interest to a wider audience. This will be a three-part topic:   gores and closures on extant kaftan, creating the button and loop method of closure and creating the braided/woven band style of closure called çaprasts. As I've started writing, it occurs to me that a post on buttons might be useful too.  Apparently, I have a lot to say on this topic. :)


There are two basic patterns seen in the extant Ottoman kaftan (for the purposes of this discussion I am excluding the over-kaftan with the long hanging sleeves that you see in a lot of 16th-century Ottoman miniatures.)

The short-sleeved -frequently cut with the archer's curve in the front and often including detachable long sleeves (as discussed in my previous post)

And the long-sleeved kaftan

photo from Türkiyede Tarikat Giyim-Kuşam Tarihi

Both patterns include front gores. Based on what I have seen & read, the gores can be one long gore on the left going from the hem to the neckline and the right gore starting approximately at the waist. or, towards the end of the 16th century, both gores from the waist. Although looking closely at the kaftan above and the fact that the diagram implies two symmetric sides, that would mean this particular kaftan had two gores starting at the neck. I have not seen any other examples of two long gores, but I also haven't been looking specifically at the gores until recently.  I may have to do a visual tour of kaftans specifically looking for more kaftan with two long gores in the near future.

There are multiple extant examples with the gore cut with the front as a single piece such as the example below.  You can see from the brightness and lack of wear on the "gore" that it functioned like a placket and was mostly hidden under the closures.


kaftan with gores cut as a single piece with the fronts  late 16th century
photo credit: Millicent Ryan
Used with permission


Sometimes the gores were cut separately.  I usually cut my gores separately because, since kaftan use rectangular construction, it's much more fabric efficient.  It's also useful if you are using loops to close your kaftan.

detail of kaftan with separately cut gores  c. 1550
Topkapi Sarayi Museum, Istanbul
TSM 13/100
Photo from Style and Status


The two primary closures on extant kaftan are loops and buttons (as above) or the braided or woven closures called Ã§aprasts. Some kaftan had no closures but presumably were held closed by the sash or belt worn over them.

detail of kaftan, first quarter of the 16th century
Topkapi Sarayi Museum, Istanbul
TSM 13/46
Photo from Tablet Weaving from Anatolia & the Ottoman Court


detail of  child's kaftan, 16th century(?)
Topkapi Sarayi Museum, Istanbul
TSM 13/1035
Photo from Tablet Weaving from Anatolia & the Ottoman Court


Next:  Part II:  recreating the button and loop method of closure.

____________________________________________________

Arnold, Janet. “A Caftan, said to have been worn by Selim I (1512-1520)”. Costume, Vol 2. 1968.

Atasoy, Nurhan. DerviÅŸ Çeyizi: Türkiyede Tarikat Giyim-KuÅŸam Tarihi. T.C. Kültür Bakanlığı, 2000

Atlihan. Serife. Tablet Weaving in Anatolia and the Ottoman Court. Marmara University Press, 2017.

Ryan, Millicent. Journey to the Clothworkers' Centre.  self-published, 2018.

----.  Style and Status:  Imperial Costumes in Ottoman Turkey. Azimuth Editions, 2005.

Sunday, July 26, 2020

Sixteenth Century Kaftan Sleeves

While I was cleaning up the sewing room a few weeks ago, I came across the pile of kaftan sleeves that had been in Time Out since last year. When I cut out a kaftan, I usually cut it with short sleeves with the archer's curve in the front and then cut a separate long sleeve that can be worn with the kaftan or mixed and matched with other kaftans.


This is based on several extant sets of kaftan + detachable sleeves in the same fabric as the kaftan and extant sets of sleeves that have no extant kaftan.


child's kaftan with matching sleeves

second quarter of the 16th century

Topkapi Sarayi Museum, Istanbul

TSM 13/1015 & 13/927

photo credit www.kostym.cz


Sleeves

16th century

Topkapi Sarayi Museum, Istanbul

TSM 13/1945

photo from: A la cour du Grand Turc


kaftan with matching sleeves

c. 1550

Topkapi Sarayi Museum, Istanbul

TSM 13/100

photo from: A la cour du Grand Turc


Very late in the 16th century/early in the 17th century, you also see some illustrations of sleeves that were clearly of a different fabric than either the outer kaftan or the inner garment. Sleeves contrasting with the outer kaftan but clearly matching the under kaftan are most commonly seen in Ottoman miniatures.


Kiz, an unmarried Girl

Habits of the Grand Signor's Court

1620

British Museum 1928,0323,0.46.103

photo credit: British Museum


excerpt of folio 14.b

Album of the World Emperor

c. 1610

Topkapi Sarayi Museum, Istanbul

Bagdat 408

photo from: The Album of the World Emperor


However, because I live in the Deep South where it is Too. Darned. Hot. much of the year, the sleeves never seem to get finished. So, last summer while Jay was at Lord Baltimore's Challenge, I set down to binge-watch Netflix and finish off 4 pairs of sleeves with silk facings and topstitching. I got through 2 pairs and was working on the third when I took a look at the sleeve and thought: "something is definitely wonky here"


I have no idea what I was thinking when I cut them out, but they all needed to be shortened and sized down. My hypothesis is that I cut the first pair incorrectly, noted the sleeve measurements down in my pattern journal, and because I never finished off the first pair, proceeded to look at my journal and repeat the error three more times.


What was I thinking?!?


Infuriated at wasting the better part of 2 days hand-sewing, I tossed the whole pile into the Time Out bin and forgot about them until a few weeks ago. Since I didn't have any pressing projects, I decided to finish them once and for all.


The red/turquoise and the black/white sleeves are to kaftans that are already finished. The blue/red & teal/beige sleeves are from kaftan that I started for Gulf Wars 2019 and never got around to finishing. Guess I know what my next projects are. :)


 photobomb: Lafayette


My standard method for kaftan sleeves is unlined

but faced on both ends with silk


________________________________________

Fetvaci, Emine. The Album of the World Emperor: Cross-Cultural Collecting and the Art of Album-Making in Seventeenth-Century Istanbul. Princeton University Press, 2019.

Maury, Charlotte ed. Al la cour du Grand Turc: Caftans du Palais de Topkapi, Louvre Editions, 2010.