Saturday, January 25, 2014

2014 HSF goals

This is mostly to get my ideas down somewhere as a reference, so apologies if this is a less exciting post than usual. Some of the goals are pretty aggressive and this is definitely more than the "half marathon" that I told myself I was striving for, so I'm giving myself permission to skip a challenge here and there to stay sane.

#1: Make Do & Mend
Complete

#2: Innovation - due Sat 1 Feb.
Skip, but plan on doing for the "ReDo" challenge later in the year.  While researching for the Pink challenge yesterday, I found a fun innovation, but have too many other projects with hard deadlines at the moment to slip this challenge in, since I was only planning to do the "half-marathon"

#3: Pink - due Sat 15 Feb.  
Embroidered handkerchief..which is turning into much more of a production than I originally anticipated

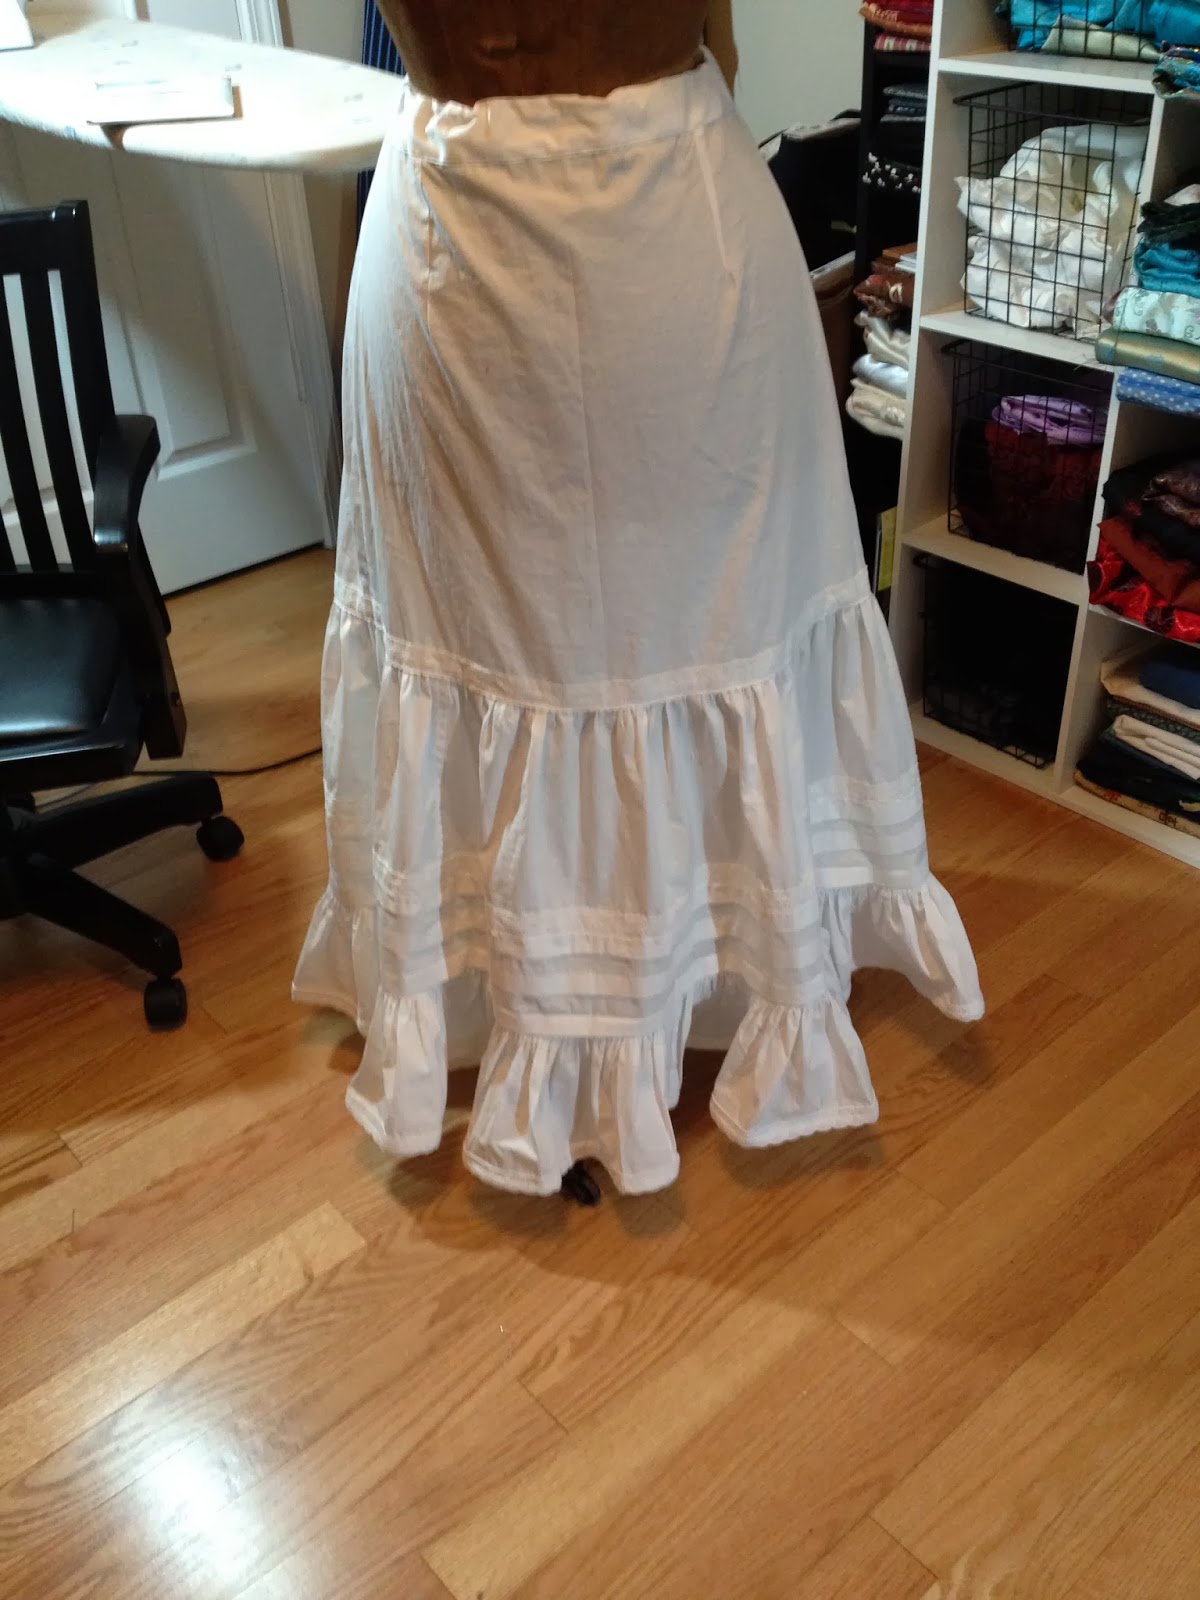
#4: Under it All – due Sat 1 March 
pantaloons from Victorian Undergarments class

#5: Bodice -due 15 March    
SKIP

#6 Fairy Tale -due Tues 1 April
1860s dancing shoes from Grimm's "Twelve Dancing Princesses" or a purse from The Little Purse with Two Half Pennies or The Silver Shilling
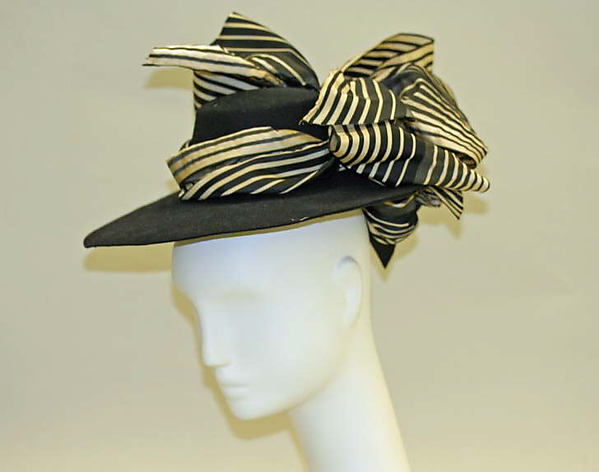
#7: Tops & Toes – due Tue 15 April.  
Hat from 1880s hat class

#8: UFOs & PHDs – due Thur 1 May.  
Finish the uchigi I cut out but never started sewing

#9: Black and White – due Thur 15 May.
Still seeking inspiration but with as much as I love black, it shouldn't be difficult

#10: Art – due Sun 1 June.  
Medals from Alexander Suvarov painting?

#11: The Politics of Fashion – due Sun 15 July
The Edourd Josef Wimmer-Wisgrill dress that I previously posted about?  

#12: Shape & Support – due Tue 1 July.  
Corset from Victorian Corset class?  Panniers for Robe d'Anglaise?

#13: Under $10 – due Tue 14 July.  
Still seeking inspiration

#14: Paisley & Plaid – due Fri 1 August.
1890s skirt with the grey/black red plaid in stash?

#15: The Great Outdoors – due Fri 15 August.  
A  muff from the fake fur in stash

#16: Terminology – due Mon 1 September.
An Indespensible

#17: Yellow - due Mon 15 September
Still seeking inspiration

#18: Poetry in Motion - due Wed 1 October
Something medieval from a folk song?

#19: HSF Inspiration - due Wed 15 October
Wait until later in the year to decide

#20: Alternative Universe – due Sat 1 November
Still seeking inspiration but it shouldn't be difficult

#21: Re-do – due Sat 15 November
Redo Innovation

#22: Fort-nightliers Choice – due Mon 1 December. 
Can't decide till I know what the challenge is

#23: Modern History – due Mon 15 December
Still seeking inspiration

#24: All that Glitters – due Thur 1 January. 
Edwardian evening gown?

Wednesday, January 22, 2014

Busy Like a Bee.. Victorian Undergarments Class and planning for HSF#3

So many things I want to work on!  Supplies for a variety of projects ordered from the web and I feel like a little kid running to the front door to see if anything has arrived every 5 minutes.

I signed up for Historical Sewing's "Victorian Undergarments" Online class and have been having a lovely time meeting my fellow classmates in the FB group and ordering patterns and fabrics for the class.  Since I don't know any fellow historical costumers in Atlanta, sewing can be kind of lonely and it is absolutely lovely to have a "Ladies Sewing Circle and Terrorist Society" to chat with and benefit from the "hive mind" and general companionship of like minded sewers.

Several of my fellow students were talking about doing undergarments and I found myself in analysis paralysis...  did I want to do black...  I love black..  and I do have a lovely stash of black laces and trimmings.....  but white was so pretty..  and more historically correct....

Solved my dilemma the usual way...  by buying both the white and the black!  My justification was whatever I didn't use immediately, I'd use it for something (sooner or later).  Hi...  my name is Alison and I am a fabric addict.  *sheepish smile*  Of course while buying the lawn, there may have been a few other things that slipped into the cart from the $3 a yard section...  a pretty green cotton/silk pique that might be an Edwardian blouse someday, some tan cotton/silk duponi that just begged to be dyed a deep gorgeous red or purple and some black and yellow pinstriped shirting that I think I will make my petticoat out of for class.  On my monitor the yellow looks like a soft ivory...  I'm praying it doesn't actually look like a bumble bee.  If it does...  it will end up being lining for something.

I also bought the handkerchief linen I needed for HSF#3....  and I totally blame the whole Pink theme for the hydrangea pink silk suiting I bought...  I have been so inundated by pink, thinking about the challenge that it wouldn't let me check out without being in my cart.  In my defense, it was also on the $3 a yard page.  Not sure what it will end up being (and know I won't touch it before the HSF #3 deadline) but it's now mine!

My "simple* idea for HSF #3 is turning out to be more complicated than I originally thought...sometimes I think I could complicate boiling water :)  I was planning on doing some pink embroidery on an existing handkerchief because I didn't have any handkerchief linen on hand.  But I thought about how superior my embroidery frame is to an embroidery hoop and remembered a pin I'd captured on my techniques board months ago of an 18th c. waistcoat that had been embroidered on the fabric before it was cut out.  


From the Museum Rotterdam: Uncleaved vest ivory white silk embroidered with floral motifs

So my plan is to mark out the handkerchief on the uncut fabric, baste the ends to the embroidery frame and do the embroidery before actually I cut out the handkerchief.

As to the pattern itself, I found a Dover book on white work that had some pretty corner patterns on the cover, but I wasn't sure what, if any historical the designs were from...  but as luck would have it, one of the reviewers that gave the book a 1 star rating was complaining that the book was nothing more than a reprint of The Chief Pattern Bool of Embroidery Patterns for the Improvement of Artistic Embroidery on Linens and the Promotion of  Good Handicrafts, first published in 1900 in Germany.   It was $7 on Amazon, adds to my back burner research of turn of the century German fashion and has a corner pattern on the cover that I like.  Which is important because of all of the sample pages Amazon made available, not a single one of them was a page of patterns.  Really, Amazon?!?!?

The intro of the book, which was available, talks about a pin prick method for transferring embroidery in which pins were pricked into the pattern at regular intervals, the pattern was placed on top of the fabric and chalk was forced thru the holes, thereby transferring the pattern.  I have to admit, I am curious to try this method, though I suspect it will end up being a spectacular failure.  But hey...  I have to indulge my curiosity!

I've gotten some recent feedback that the white sans serif font on black is difficult to read on the blog. I bumped the font size up 3 pts in response to that, but I'd be very interested in hearing from other people if they are having difficulty as well.  I definitely want it to be readable, but right now my data sample (one person says difficult to read, one person says they don't have any problem) is too small make any significant changes yet.

Tuesday, January 14, 2014

HSF #1: Make Do and Mend (or Finishing a Hat)

Pretty much all of my favorite costuming bloggers have posted extensive recaps of their 2013 accomplishments and plans for 2014 projects.  While they were all delicious to read and revel in the pictures and creativity, when I looked at what I'd accomplished in 2013, it felt pretty inadequate in comparison.

Which initially coloured my thoughts on doing Historical Sew Fortnightly 2014.  I adore the concept of HSF.  It is pretty much everything I aspire to as a historical costumer.  I love seeing the creative ways that other costumers interpret the challenges and the gorgeous garments and accessories people create. But I'd been a failure with it in 2013...

1)  I only discovered it once it was over half way through
2) I kept failing to find a creative way to work my current list of basic costuming needs into the challenges. I am building my costume closet from the ground up.  I have a lot of "unsexy" projects to sew through to have the right foundations for all my impressive ideas
3)A challenge every 2 weeks  combined with my sewing schedule meant less than 10 hours to complete anything.

So I thought maybe I would just lurk and enjoy HSF 2014 from the sidelines.  But then I took a look at the full list of challenges for the year and realized that I had vague but immediate ideas for most of the odd numbered challenges. And it was permissible to do a "half marathon" and do odd or even numbered challenges.

 So I am tossing my hat (pun intended) into the ring and hoping to complete the half marathon in 2014.

Of course, I made this decision with a scant 3 days before challenge #1 is due (why make it easy on myself? :)  ), so this project is pretty modest.  But I think it fits the spirit of "Make Do and Mend" nicely.  I imagined myself as a shop girl using what she had on hand to spruce up an old hat to be a little more au courant, because she couldn't afford to buy a brand new one.

History of the Original Hat
Years ago, I bought a black straw hat in a resale shop and re-trimmed it with some scrap velvet, some vintage millinery feathers I'd had since college, an only slightly broken antique buckle  and an a pair of hair sticks that I had on hand.  I wore it with a pseudo Edwardian outfit for a live action Vampire the Masquerade game.  It's spent the past 10 years or so hanging on my bedroom wall.   It was definitely time for a(nother) refresh!  Even so, I had a brief pang of regret as I disassembled the trimmings.


But proceed I did! Taking it apart left me with some better than I expected trimmings and a slightly droopy straw hat to work with. Ironically, the feathers look much less ravaged off the hat, so they will be going back into my millinery stash.


Looking at the bare hat, it seemed a bit small for the classic Edwardian look I'd first envisioned:

Originally from Ladies Home Journal March 1912, posted at www.fashiononehundredyearsago.com

However, I also found a similar hat in the Met Collection from 1890:

Hat c. 1890  H. O'Neill & Co. (American, New York) in the collection at www.metmuseum.org 


I'm working on a 1890s walking skirt and shirtwaist and it would be nice to have a hat to complete the ensemble, so 1890s it was going to be!  I was briefly stalled on what I had on hand that was crisp enough to hold a bow, but I remembered some left over silk duponi that had already been used for 2 projects.  It wasn't striped (a pity) but it was on hand. My inner Victorian shop girl felt extra thrifty..  even though silk duponi isn't entirely period correct.


The plain bow was sort of cute just by itself, but my inner shop girl won out and I added a few more loops  of silk and kept tacking and poufing until I was happy with the result.    But it still needed...something...  so I added back the buckle that had previously been on the hat.

 The new and improved hat
Close up of the bow

The Challenge:  #1 Make Do and Mend
Fabric: Silk duponi, straw hat base, some existing velvet trim on the hat
Pattern: Visually inspired by the hat from the met pictured above
Year: 1890
Notions:  Thread
How Historically Accurate is it? 50%?   It's inspired by an extant hat, but materials are modern
Hours to complete: 3ish
First worn:  Probably in February 2014
Total Cost: $0  I made do entirely with materials I had on hand :)

Wednesday, January 1, 2014

Holiday Goodies! (wherein the heroine loses her fortune at a fabric sale)

The best present I got was two weeks off of work and I've finally had some time to sew!  But coming in a very very close second was the professional dressmaker's dummy in (close to) my measurements that Jay got me.   Since I don't know anyone else in ATL that does historical or steampunk sewing, trying to do fittings being fitter and fittee had been driving me batty.  Hoping the dummy will be a big help on that front!


Jay also got me a cute little "sewing bird" for my sewing table


and a copy of Style and Splendor: The Wardrobe of Queen Maud of Norway 1896-1938 (that I'd been drooling over for close to a year)
Jay's sister got me a copy of The Empire's New Clothes: A History of the Russian Fashion Industry, 1700 -1917 (which I had also been lusting after) so I have 2 new books of fashion porn..  err research. :)
And Hancock Fabrics was having crazy After Christmas and New Year's Day sales so I laid in a good stock of black, burgundy and cherry red rayon velvet at (I kid you not) $7.65 a yard as well as some nice wool at 60% off and found some real bargains in wool and linen on their $2.97 table.  


I also nabbed a bolt of this cotton for $1.29 a yard that just seemed to say Wiener Werkstatte print (admittedly, early 1900s Viennese textiles have only been a casual study for me to this point) so I might give that Eduard Josef Wimmer-Wisgrill dress from my last post a go at some point this year.  If it turns out to be all wrong, then its a pretty lining for something.


On the actual sewing front, I finished my 1890s petticoat (Truly Victorian TV170, view 4) which was both a lot of fun and a lot of frustration to make.  The bottom ruffle is 10 yards long and it was my first time using a ruffler attachment.  The ruffler is great fun, but it took about 4 tries on different settings to get the ratio of ruffle to petticoat (with the corresponding pick all the threads out and ruffle 10 yards of fabric again...  and again..  and again)  One of my first projects of the new year is to do test runs on each setting of the ruffler so I know the setting I need in advance next time.  But I was watching Dr Who while sewing, so at least the time spent redoing wasn't too too tedious.

This was supposed to be a plain, basic petticoat as a test run with the plan that it would be an under-petticoat long term once I knew how the pattern went together and could get some nice cotton organdy. But me, being me, I had to add trim, which of course, extended the time it took to complete.


So I was all set to start a new project, but both options were thwarted right out of the gate.  The Reconstructing History pattern  I had for a 1940s dress had 2 versions on the front but no collar  pattern pieces or instructions for version that I wanted to make. And despite being certain I owned it, I did not have the 1890s walking skirt pattern that was also on my short list for projects.

So I emailed Reconstructing History, placed an order from Truly Victorian and moved on to plan C:  a Victorian chemise and drawers pattern included in the Laughing Moon Dore/Silverado corset pattern I had and I rang in the new year in the sewing room, cutting out a chemise.

I still have no idea what I am wearing to AnachroCon next month, but whatever it turns out to be, my undergarments will be pretty! :)


Saturday, December 14, 2013

Wherein our heroine becomes obsessed with early 20th century Vienna

I love days when I discover new things!  I was spending a leisurely Saturday morning perusing Pintrest over coffee when I came across a pin by the Dreamstress and was instantly enchanted.  (photos from the collection of  the Austrian Museum of Applied Arts/Contemporary Art)


The next pin was even more enticing:


It was like wearable Klimt or a German Poiret...it was Eduard Josef Wimmer-Wisgrill -who I had never heard of but was immediately fascinated by.  I'd never seriously explored early 20th century Vienna..  but clearly its time to remedy that!

The lovely synergy with this is that Andover Fabrics just released a Downton Abbey Collection and their Mary's Berry print looks surprisingly similar to the fabric in that first gown. And I'd been wanting to play with making fabric roses like that, but just didn't have anything to use them for. There may be another project in my future!


Saturday, December 7, 2013

A real cutting table!

I've been wanting a costume stop style table you could stick pins into for ages. This morning I woke up and decided that today was the day I was going to break down and cross the project off my to-do list.

We have a game room in our basement with an 8'+ table from Ikea that we inherited from friends.  We don't use the game room much so my plan was to get a piece of homasote, cover it with muslin and set the table legs up on cinder blocks to get some additional height.  That way, if we needed the table again, I could just remove the homasote and cinderblocks.

When I did this in the 90s, I was living in Iowa and it was a simple matter of walking into Menards and buying a 4x8 sheet of homasote.  Alas, this is Atlanta and we don't have Menards.  No one in Home Depot had the slightest clue what I was talking about when I said I needed homasote and were so adamant about it not existing, I was beginning to question my own sanity.  I ended up with a 4x8 sheet of 2" foam insulation, which the guy also swore we would never get home tied to the top of our car before it broke (because, of course, our station wagon apparently has a 47" opening not a 48".)

We did, indeed, get the foam (which was, oddly enough,  a lovely shade of lavender) home with a minimum of damage (most of it incurred by the Lowe's guy that tied it to the roof in the first place). And Hobby Lobby had 90" muslin (which I didn't expect) so in under 2 hours, I had a cutting table that wouldn't kill my back, wouldn't scratch my dining room table AND I could stick pins into.  Why didn't I do this years ago?


I have some reservations that the foam is going to end up disintegrating, from cat claws and tracing pattern marking, but I will deal with that when it happens.  For now I am just happy to have a real cutting table.

Materials:
4 yards 90" muslin: $34 (I could have cut that cost in half by buying it on the web)
1 4x8 sheet of 2" foam insulation $36
4 cinder blocks $1.25 each
Staple gun & staples  $12

total cost: $88

Epilogue:  I googled Homasote to prove to myself I wasn't hallucinating and sure enough, it does exist. Better still, I found a thread on a model railroading board where someone asked where to get it because their Lowes didn't carry it.  The overwhelming response was:  Go to Menards.  Vindication! :)

Saturday, November 23, 2013

The Regency shirt (or wherein our heroine finally overcomes her fear of buttonholes)

I have a deep, dark secret...  I have little to no experience making buttonholes.  *blush*  I am far more versed in eyelets, grommets, snaps and hooks. Nothing I made during my SCA years used them, buttonholes aren't very common when you're sewing for ballet and we sent out buttonholes out to be professionally done in the other costume shops I worked in.

But Jay was kvetching that I never made him anything and I needed to replace the shirt he wore to Sunday in the Park anyway, so I set about making a simple cotton shirt.  Since I no longer had my trusty men's basic shirt pattern (what was I thinking when I donated all the patterns I'd ever drafted to the local SCA as I packed to move to Atlanta???) I settled upon Butterick Making History 4486 as a starting point ..a loose starting point.

Butterick Making History 4486

The directions..didn't make much sense to me.  I ruined one shirt body trying to put on the facings their way and read the directions for attaching the cuffs to the sleeve at least a dozen times feeling stupid before I tossed the directions into a corner and followed my instincts.  I narrowed the collar, skipped the lacing, changed the facing, added a separate cravat and ended up with a product that I was pleased enough with (it's a white cotton wardrobe staple...  it's about a 4 on the impressive project scale)..  and then it was time to put in the buttonholes...

So I cut out the pattern pieces for an Eton Jacket I was going to play with...  

I cleaned the sewing room top to bottom...  

I pressed the cotton I was using as a mockup for the jacket...

and then work got crazy, so the shirt sat for a number of weeks..

Well, work has hit a new level of crazy but we were trapped in our subdivision most of the day because of a Thanksgiving parade, so I got some sewing in ..and I had no excuse for putting off the button holes any longer.  I seriously thought about putting the buttonholes in by hand for a while I was so phobic about machine buttonholes...and I realized that my Bernina had an semi-auto buttonhole feature that let me get a decent enough buttonhole on my sixth or seventh practice attempt.   So I held my breath and reached for the otherwise finished shirt.

Are they perfect?  No.  Am I still going to try buttonholes by hand at some point?  Probably.  But they were a lot less daunting than I had been afraid they were going to be. 

Buttonholes with cufflinks

I'd been idly toying with the thought of a neck stock to give the shirt a more Regency feel (mostly because I liked the look of it) when as serendipity would have it, I was reading my morning blogs today and I ran across a lovely post by Mouse Borg Designs about making a neck stock.  So using her directions, I had a decent looking neck stock in about an hour...more buttonholes and all!


Neckstock

I do think that the neck stock under the cravat adds a lot to the look. (in spite of the fact that I didn't put much effort into tying his cravat)


 Jay in the finished shirt (and the first vest I pulled out of the costume closet just to see how it looked under a waistcoat..its all wrong for the shirt)

One thing about this pattern is that it runs very big.  (I'm used to pattern sizes being generally smaller than the corresponding ready to wear size)  Jay wears a 40R jacket so I cut the L pattern and he wasn't around when I got the shirt body together, but I was more worried that it would be a trifle snug than anything else.  If  I make it again, I would definitely size it down to a medium for him.

Another thing is that the front facing is very very long.  I cut it shorter than the pattern called for and it was still longer than I was happy with.

Fabric: white Kona Bay quilting cotton
Pattern:  Butterick 4486
Year:  Regency period although the ruffles on the cuffs are incorrect for that
Notions: thread, lightweight interfacing, 4 buttons for neck stock
How historically accurate is it? meh.  It's 80% machine sewn from a Butterick pattern.  I'm happy with it looking good for steampunk.
Hours to complete: hard to say since my time to sew has been in small "stop and start" sessions lately.
First worn: TBD.  Probably at AnachroCon in February
Total cost: $0. The fabric was from my stash and I'd picked the pattern up last year at a pattern sale at Hobby Lobby.